After
trying various things in an attempt to convince her to ride the board to the
ground, I was at a loss for what to do. Unfortunately, most articles and videos
that explain methods for teaching the teeter focus on building the dog’s speed
and confidence on the obstacle. Obviously, this was not Leila’s problem. She
has no shortage of speed and confidence on the teeter ;) Very few resources
addressed my problem: the over-confident dog.
When Lynne
Stephens came to give a seminar in May and showcase her new teeter training
device, the Tip-Assist, I was very
interested. Finally, a piece of equipment that would allow me to reward her for
staying on the teeter while it is in the air without having to hold the board
myself or use potentially dangerous things to hold it up. Below is a basic
synopsis of teaching or retraining the teeter using the Tip-Assist.
First Things First
First Things First
Have a
mental picture of your dog’s final teeter performance before you begin. Ideally
you want the dog to run to the end of the plank, ride it to the ground, and
then assume his end position
Work on
some foundation exercises to increase the dog's speed, confidence, and
independence before you begin working with the actual teeter. Things to work on
include getting the dog comfortable on a boggle board/moving surfaces, plank
work, targeting, shaping games, teaching a release word, and making sure that
the dog is not afraid of loud noises
Now you're
ready to begin training in the Tip-Assist.
Using the Tip-Assist
Using the Tip-Assist
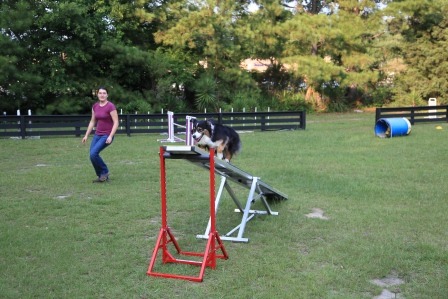
Step 1
- Start the dog by allowing him to hop onto a low, stationary board.
- Set the Tip-Assist on #16 and place it under the ground end of the teeter, moving it as close to the center of the teeter as possible. This should place the ground end of the teeter a few inches off the ground and not able to move. (see photo below)

- Wrap the dog around your body and have him hop onto the side of the board and walk into a 4-on position at the ground end of the teeter. The teeter board should not have moved and the dog should be standing as close to the edge of the elevated board as possible. (see photos below)


- Reward the dog heavily for
staying in position (food is much easier than using toys), then lift him
to the ground.
- Once the dog is happily hopping onto the board and waiting in position to be rewarded, you can move to step 2.
Step 2
- Teach the dog to ride the board
down a few inches.
- Leaving the Tip-Assist on the same end of the teeter as the last step (the ground end), raise it up to #4. This time you will be working on the opposite end of the teeter. What is usually the “up” end of the teeter should now be 4-6 inches from the ground and will move when the dog jumps on it. (see photo below)

- Wrap the dog around your body
and hop onto the side of the teeter. Have the dog ride the board down and
move into his end position (either 4-on or a 2on-2off on the ground.) (see photos below)


- Heavily reward the dog and give him his release word. Because the board moves a few inches at this stage, the dog may take more time to get comfortable with this step. You do not want to move past this stage until the dog is completely confident hopping on and riding the board down a few inches. If the dog is having a lot of trouble with the motion, move the Tip-Assist in more towards the center of the teeter to lower the end.
Step 3
- Place the Tip-Assist under the up-end of the teeter at #1 or #2 so that the board does not move. (see photo below)

- Hold the dog on leash and walk
him up the stationary board (the same way he would go up if he was going
to perform a normal teeter.
- Reward the dog when he is all
the way at the end of the board in a 4-on position. The board should not
move at all when the dog walks up. (see photos below)


- Lift the dog onto the ground.
- Allow the dog to increase speed
each time he goes up the teeter, removing the leash when he is confident.
You eventually want the dog to be running full speed up the board and
waiting to be rewarded at the very edge of the up-positioned board. (see video #1 below)
Proofing Performance
Before
lowering the Tip-Assist, start proofing the teeter performance. You want your
dog to do the teeter independently right away.
- Vary handler positions and handling each time, adding things such as a front-cross, rear-cross, running past, hanging back, staying close, getting lateral distance, and running at different speeds. Your motion should not affect the dog’s performance. He should confidently drive to the end of the teeter and wait to be rewarded no matter what you are doing. (see photos below)


- Add obstacles before the teeter to increase the dog’s speed and excitement, and create a more trial-like environment. Rev your dog up and use high value rewards to keep the dog motivated and excited about the game.
Improving performance
Once the
dog is confidently completing the stationary teeter with the proofing exercises,
you can move the Tip-Assist down one number so that the teeter has a slight
drop. (see photo and video below)

Continue to
lower the board until it is dropping all the way to the ground. Once the teeter
is falling to the ground, make sure to reward the dog in whatever end position
you have chosen (4-on or 2on-2off) and give your release word before you allow
the dog to move.
See the Results!
After
working with Leila using the Tip-Assist since mid-May (about 2 weeks), we have
just this week made it to the stage where the teeter is falling to the ground.
We have not had many opportunities to test her new performance, but from the
few repetitions we have done, I have been very pleased with her teeters. Her
performance is not yet exactly how I would like it, but there is significant
improvement. She is no longer flying into the air, and with my crazy girl that
is a major victory. We still have another month to work on her teeter
performance before I go back to school and lose access to equipment, so I will
continue to proof her teeters, adding as much speed as possible to reinforce
her holding onto the board even when she is excited. Training using the Tip-Assist
has been very fruitful for Leila and me, and I would suggest that anyone
experiencing teeter problems to give it a try.
Good Luck!
Courtney Hoslcher
Leila and Sandy
Good Luck!
Courtney Hoslcher
Leila and Sandy
Great write up, Court! I would say that for people who like to have more info, the Wendy Pape video shows the sequence of steps similar to the ones you used--just without the tip-assist (clearly a very helpful tool!). It's the same concept, though, and I would definitely recommend it.
ReplyDeleteCould you put up a link to the video by Wendy Pape that you mention, please? It'd be greatly appreciated.
DeleteFantastic article Courtney :))
This is such a great resource that you are providing and you give it away for free. I love seeing blog that understand the value of providing a quality resource for free. how to train a dog
ReplyDeleteWhere can I get a tip assist?
ReplyDelete